I made this iPad case on April and forget to wrote about it. So sorry for not posting for a long time.

This is the 1st machine project after the coming back of my machine. My husband requested for his iPad case for months and I would like to try the new applique' method that I decided to do by machine. It mixed between back basting method, raw edge applique' and cutwork. I could not find the proper term for this method. Is it "reverse applique"? I didn't use fusible web for this project as I think it look soft and artsy with fray edge. As the design has a lot of small details and my hubby need the durable case. He was waiting for this case for a long..... time. I had to make it as fast as possible so machine applique' was the best choice.
(For back basting I found the interesting blog posting here (You may find a lot of online articles about this method, just google "back basting". ) Almost of the articles for this method are hand work. I may try it someday, I think it is great for carry-all projects.)
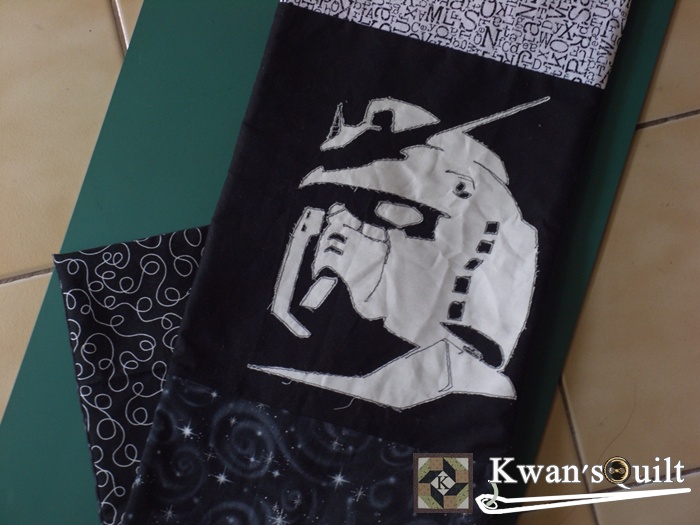
The original picture had seen on my hubby's hobby magazine cover. It was too small and blur edge so I scanned the picture and computer drawed the new outline and add more details. This robot is Gandam RX78-2 from japanese manga.
This is how I made this case.
Resize and print the pattern on tracing paper, reverse the image.Bind the design on the wrong side of background fabric(Black). In this photo I hand-paint black color on the eyes and some spaces that need to cut out the white fabric after stitching.

And bind the applique' fabric(White) on the right side.

Adjust the machine straight stitch length to 15 stitches per inch. Stitch along the printed lines. From my experiences, the longer stitches may loose when we tear the paper off and the shorter stitches are bulky and may ruin the paper pattern before we finished. However the stitch length depend on the thickness of your paper if you use the regular paper (the standard printed paper or photocopy paper), you may use the shorter stitch than mine.

Rip the paper and adhesive tape off. I found the the 3M-Magic tape leave some glue residue on the black fabric so if you want to try this method, basting may be the better choice.

Trim the white fabric next to the applique' edges.

Join the top and back panel to the block. Then place the patchwork unit and backing right side facing together on top of the batting. Stitch around ,leave the opening on side and turn the right side out. Hand sew to close the opening.
To secure the applique pieces and quilting this pieces, FMQ along the outline of the applique' and quilt in the ditch next to the seam of top panel. Then hand assembled both side. Why do I choose to do it by hand? Oh, it is my hubby request, he want the soft, no-bulky seam case and bigger than normal case as it is easier to grab.
So it finished.
Happy weekend

