Friday, October 30, 2015

Print your label by home inkjet printer.

I usually print my own label using my Epson inkjet printer. I used to print them on light-weight white polyester-cotton blend fabric that I found here. The result was fine. If only it can hold more ink and was 100% cotton.

Last year I bought  5 yards of American made-PFD cotton fabric from eQuilter for wholecloth painting experiment. At first I thought that it was the same as Kona cotton but it wasn't , this fabric was thinner and stiffer than Kona. So I just left it in storage box. (Almost forgot about it.) Until yesterday I printed my new sized labels. I made them slightly bigger so I can use with bias maker. At first I printed them on white Kona , I ironed fabric to freezer paper and fed to printer. The result was terrible. The fabric was too soft. Then they curled and separated while printing. OK, Not every printer love Kona cotton. I had to clean printer head twice. If I have to print some thing on Kona I will order from Spoonflower. The next, I used American made-PFD with label sticker on the back. (Label sticker is the printable sticker that use for print product label). They were better than I expected. They looked great and the most important point was my printer still perfect fine.


After heat fixed and washing test, they slightly faded. Normally computer- printed fabric may fade after wash as the inks did not penetrate to the back. They just smear on top so they may scrub off while washing. As my craft may not wash often so this way were fine.


Actually I planed to print my labels on Spoonflower, those labels were my print testing swatch. With beyond expectation result, at this time I had 110 labels in hand for small purses and crafts. Anyway I may order quilt labels from Spoonflower when I finish my miniature quilt top. I was not decided that I should print the whole backing or small labels. 
Even though I found perfect combination for fabric printing with my printer (Epson ME 340, genuine Epson Ink), I will not print them often as the risk of printer's head broken is so high.

I just share my experience, If you would like to try this way, take your own risk. I am not responsible to your broken printer.

Have a wonderful weekend.


Saturday, March 7, 2015

Hexagon patchwork : English Paper Piecing

My goal for this year is making a miniature quilt. I found that English Paper Piecing is the recommended way for small geometric shape/tessellation quilts. I started with hexagon patchwork. At first I thought it was time consuming method as we had to work twice (I mean basting and piecing steps) and why the stitches are shown. I had tested and tried in different ways, tools and materials. The tips and technique that I share below was what I found and the way I work.

I: Materials and Tools

Paper Template - My favorite paper is 170 gsm cardstock. I had tried typical printing papers, cardboard and expensive plastic templates and don't like them all. I also printed and cut all paper templates myself.


Needle - I prefer short and small needle like #12 quilting needle.


Thread - I always leave the basting thread in my quilt so white threads/batting colored threads are my choice. I use both polyester and cotton leftover threads for basting. For piecing, I use coordinated color 50 wt cotton threads. At this time, 50 wt Aurifil is the best.
Fabric - Tight weave fabrics as quilting cotton, lightweight cotton are the best. I tried to use lightweight linen and the result is really bad. If I have to use them again, machine piecing and lightweight woven interfacing may help. Precut fabrics are awesome for hexies.


Plastic template - The most fun part of patchwork is Fussy cutting/Crop cutting. I make cutting templates from clear PVC sheet. I usually use square shape. If the prints are close or small hexies( 3/8inch or smaller), I will use the circle. Hexagon with 1/4 or 3/8 seam allowances is my last choice because it is the hardest way.


II : Basting

Just like the traditional way, I place the paper template to the wrong side of the fabric square. Fold the seam allowances over the template and baste.

I use paper clips, small binder clips and plastic binder clips for secure fabric and template while basting. I use a small back stitch to secure the two edge at each corner. If the edges are longer than 1 1/4", I will sew a few running stitches in seam allowances. The stitches will not go through paper template.


III : Piecing


 I use small, short whip stitches. I had tried ladder stitches and I got the weak and crooked seams. My favorite way is whip stitch while holding the folded edges together, not right side together like traditional way. With this way, the needle will catch only the back fabric and the stitches are almost invisible.
I found that plastic binder clips are useful when work with small size hexies. In this photo, they are 3/8 inch hexagons.


 For a hexagon flower/Grandmother flower, I assemble the petals (6 outer hexagon) and then join this c-shaped unit to the center hexagon.


For larger scale hexagon patchwork, I join them by row and then sew each rows together.


IV : Removing the template.
I just use my hands to remove the template. Use left hand to open the seam allowances, then grab the flat edge of template with right hand and pull it off. For 1/2" hexagons and smaller sizes, I use tweezers.

Happy sewing.

Saturday, June 29, 2013

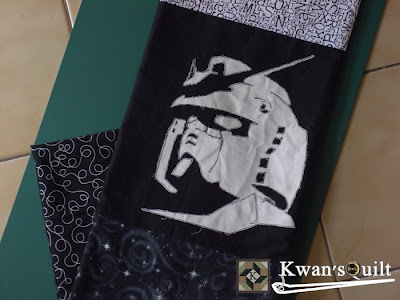
Robot head iPad case

I'm back!!
I made this iPad case on April and forget to wrote about it. So sorry for not posting for a long time.


This is the 1st machine project after the coming back of my machine. My husband requested for his iPad case for months and I would like to try the new applique' method that I decided to do by machine. It mixed between back basting method, raw edge applique' and cutwork. I could not find the proper term for this method. Is it "reverse applique"? I didn't use fusible web for this project as I think it look soft and artsy with fray edge. As the design has a lot of small details and my hubby need the durable case. He was waiting for this case for a long..... time. I had to make it as fast as possible so machine applique' was the best choice.
(For back basting  I found the interesting blog posting here (You may find a lot of online articles about this method, just google "back basting". ) Almost of the articles for this method are hand work. I may try it someday, I think it is great for carry-all projects.)
The original picture had seen on my hubby's hobby magazine cover. It was too small and blur edge so I scanned the picture and computer drawed the new outline and add more details. This robot is Gandam RX78-2 from japanese manga.

This is how I made this case.

Resize and print the pattern on tracing paper, reverse the image.Bind the design on the wrong side of background fabric(Black). In this photo I hand-paint black color on the eyes and some spaces that need to cut out the white fabric after stitching.


And bind the applique' fabric(White) on the right side.


Adjust the machine straight stitch length to 15 stitches per inch. Stitch along the printed lines. From my experiences, the longer stitches may loose when we tear the paper off and the shorter stitches are bulky and may ruin the paper pattern before we finished. However the stitch length depend on the thickness of your paper if you use the regular paper (the standard printed paper or photocopy paper), you may use the shorter stitch than mine.


Rip the paper and adhesive tape off. I found the the 3M-Magic tape leave some glue residue on the black fabric so if you want to try this method, basting may be the better choice.


Trim the white fabric next to the applique' edges.


Join the top and back panel to the block. Then place the patchwork unit and backing right side facing together on top of the batting. Stitch around ,leave the opening on side and turn the right side out. Hand sew to close the opening.


To secure the applique pieces and quilting this pieces, FMQ along the outline of the applique' and quilt in the ditch next to the seam of top panel. Then hand assembled both side. Why do I choose to do it by hand? Oh, it is my hubby request, he want the soft, no-bulky seam case and bigger than normal case as it is easier to grab.
So it finished.

Happy weekend


Friday, March 22, 2013

Useful online articles for sewing

I found these useful links while searching "sewing".

Links
Encyclopedia of needlework
How to Sew By Hand - Basic Stitches

PDF Online
Hand stitches 
Sewing stitches
Stitches and Seam Techniques
Hand sewing
Basic sewing steps  machine sewing for puppet dress. Including with how to sew the zipper, button, snap button, eye and hook and velcro.
Free sewing book : sewing lessons for the beginners from go-women.com
Glossary of terms
Hand sewing needle guide from www.sewing.org 

Google book
Claire B. Shaeffer'book lists

I'll add more links in the future.

Happy weekend

Thursday, December 13, 2012

Tortoise Shell Purse : my first pattern

The first pattern is an adorable coin purse that inspired from ...turtle (what else?). I spent a month for it, designing and making the purse are easy steps but using the computer drawing program is not. I can made this purse and take the step-by-step photographs in a day and then spent the other days for drawing, printing and checking ....repeat the process again and again to make sure that had no any mistake.


This purse is the excellent project to the hand-sewing lover, there is only one step that can do by machine. As I had tried to join them by both ways, I found hand piecing is faster and easier. It is also the proper way to use the beautiful scrap fabrics and the leftover batting.

Now available on my Craftsy pattern shop and Etsy shop.


Thursday, October 4, 2012

Handmade turtle doll

I made it on tuesday and finished on yesterday morning for my newborn niece. Because of my sewing machine incidence, I have to do it all by hand. Well, I think it is easier with hand sewing as there are a lot of curves and sharp corners ,it is my first time to make all-handmade-cloth doll, so addictive. I will do it again if I find proper fabrics. The doll is made from super soft Korean fleece that cannot be find in my area right now. I bought it from .....somewhere ( blame my short memory) and leave it in my fabric storage box for a long time. I think that I had a plan to make some of children goods in that time.
I try to update this posting on my iPad with blogger app, very difficult, because of a tiny keyboard, why google team do not release the iPad app, typing on iPad with iPhone keyboard is ridiculous.

Happy sewing!

Kwan

Tuesday, October 2, 2012

Stop for machine sewing for a while.........

Today my sewing machine is broken again when I have so many projects in have-to-do-it list. First is my square bag that still in progress (Oh, waiting for the proper zipper, I found it out of stock in my supply shop, why everyone bought the brown zippers?). The second, my husband's Ipad case that my machine is stop during the applique' process. I try new applique' method (for me), reverse applique' that I will show you next time when  my machine come back. The third, pumpkin handbag , I got an idea and draw it in my Ipad yesterday, have a plan to cut the fabric but everything have to stop because of the same reason and I still have no free time to bring it to repairing center.
What should I do?
Maybe I should go back to little hand sewing project, EPP hexagon?

Hope you have a nice day!!

Wednesday, August 29, 2012

3 Pockets Big Square Bag

Last year I designed and made it for my bestfriend as a diaper bag. I have a plan to make it again because I would like to try to sew zipper by machine. It is easy with straight edges but for curve edges a little bit difficult.


Today is cutting time!!...and basting the table runner.

Have a nice day!!

Monday, August 20, 2012

Come Shine Nine Patch Table Runner...Finished Top

My mistake!! It should be gradation block but...Look. The center squares are too white and outer red are too dark. Looked like I had a nine patch and cross quilt instead...Yeah.. It seemed to be fine with 3 layers border but that not my plan. Goodbye to gradation concept, I will try it next time if I can find more proper fabrics. Mental note, next time have to mount the whole quilt to check overall picture before stitching.


At least, I had tried.

Happy sewing!!


Friday, August 17, 2012

Come Shine Nine Patch Table Runner....Piecing

This quilt inspired by sunrise. As I have to make a wall hanging homework project for nine patch lesson and would like to try a new idea that pop in my head,  what about playing with gradation color block. The color value should be lightest at center and higher to outer....we will see.
So these are piecing step pictures for my own design table runner. As it is homework project for hand quilting class so every stitches be sewn by hand...no machine touch.. This is the first time I think back view is prettier than the front...Like a sea of seam. Hand piecing is fun.


But...I still miss my machine....
Next time I will show you the front of top.
Happy weekend!!

Basic Hand Quilting Class at Pretty Quilt Part 4

Lesson 6 : Lemon star
Project : Lemon star pillow case
The couple pillow cases I made as a wedding gift for my hubby seniors. I used the leftover fabrics from triangle patchwork bag for center star. I had learned about how to draw a pattern , sewing the set-in seams and how to make a pillow case.


Happy sewing!!